HELP CENTER / FILE PREPARATION
/ ARTWORK GUIDELINES
Artwork Guidelines
Artwork Guidelines
- Artwork Guidelines
- Layout
- Bleed
- Cutting Tolerance
- Color
- Fonts
- Image Resolution
-
01
Size
Check whether all your files are in correct size and dimension before printing. Your cover files must include correct spine width.
-
02
Resolution
Make sure all your artwork files are in high resolution. Images above 300 dpi in CMYK are recommended for your images to look clear and crisp.
-
03
Bleeds
For best printing results, make sure to extend bleeds beyond 1/4” of trim size of your project. The actual edge of a trim line can vary by little due to unavoidable technical inability.
-
04
Font
All fonts should be embedded (flatten) in your files for printing. Fonts used for text should be set in K-black color.
-
05
PDF
All your files are to be submitted in PDF versions for us to review and provide proofs.
PRINTIVE TIP: It is important to ensure all your files are correctly set up in pdf following our layout guide. All pages should be in correct size and dimension of your order, uses correct bleed and spine width, and all images use CMYK color mode in high resolution. If your files have passed all our checklists, your files are print-ready and good to go !
HELP CENTER / FILE PREPARATION / LAYOUT
Layout
Layout
- Artwork Guidelines
- Layout
- Bleed
- Cutting Tolerance
- Color
- Fonts
- Image Resolution
Layout
Typically your files should be in two separate files; Cover and Inside Pages. Your cover file consists of 4 pages total; outside front cover, outside back cover, inside front cover and inside back cover. Each page should be in the final book size of your preference. Set your cover page file in double-spreads; outside cover pages in one spread and inside cover pages in another spread. Your inside page cover should be in single-spread in the order of correct page number, also in the same of your final book size. Be sure to set correct bleeds of 0.125” (3mm) on all four sides and you can read more about it on Bleed. For saddle stitching book, your files can be in one file of all single-spread pages.
Download Layout Guide
- Perfect Binding
- Saddle Stitching
- Hardcover
- Wire Binding
HELP CENTER / FILE PREPARATION / BLEED
Bleed
Bleed
- Artwork Guidelines
- Layout
- Bleed
- Cutting Tolerance
- Color
- Fonts
- Image Resolution
Bleed
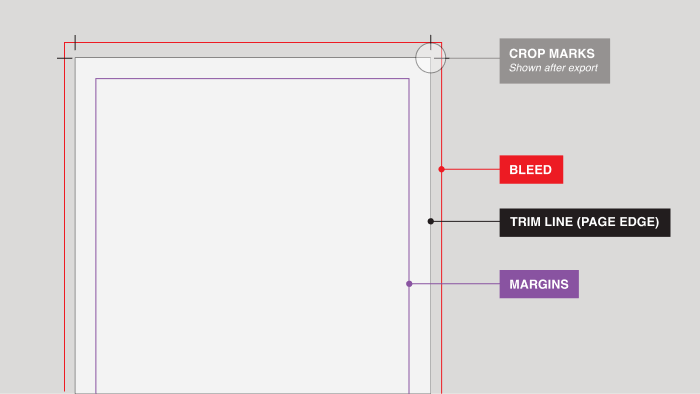
Bleed is the extra space around the outside of your artwork files that will be cut off during production. Setting up bleeds is essential in printing to allow printers to trim your documents as accurate as possible. During production, our printing machines will cut beyond your intended trim line if bleeds are set up incorrectly.
Be sure to create a 0.125” bleed in every edge of your document to create “safety zone” within the edge of your artwork files. If you have images or other graphical elements placed close to the edge, make sure to extend them beyond the size you want into the bleed zone. This ensures that when papers are trimmed to the final size, you’re left with a clean print that goes to the edge of the document as intended.
For example, if you’re preparing a standard 11x8.5” printing, you will want the final document size to be 11.125” x8.625” including the 0.125” margin to avoid your design from being cropped or lost during production.
How to set up Bleed
Setting up bleed can be done in Adobe Creative Suite such as Adobe Illustrator, InDesign, or Photoshop.
Bleeds can be set up in either existing or new documents in many other programs. If you want to start creating your files with full bleed ahead of time, open Adobe InDesign and go to Create Document and select the print option and paper size. Under Print > go to Preset Details > Bleed and Slug to add 0.125” bleed in top, bottom, left and right fields.
If you have artwork files that are already finished but do not have bleeds set up, you can add bleeds in the existing files. Go to File > Document Setup and set 0.125” bleed under Bleed and Slug options to expand the tab and enter your values.
You can download our Layout Guide to calculate and review measurements of your artwork files.

HELP CENTER / FILE PREPARATION
/ CUTTING TOLERNACE
Cutting Tolerances
Cutting Tolerances
- Artwork Guidelines
- Layout
- Bleed
- Cutting Tolerance
- color
- Fonts
- Image Resolution
Allowing cutting tolerances
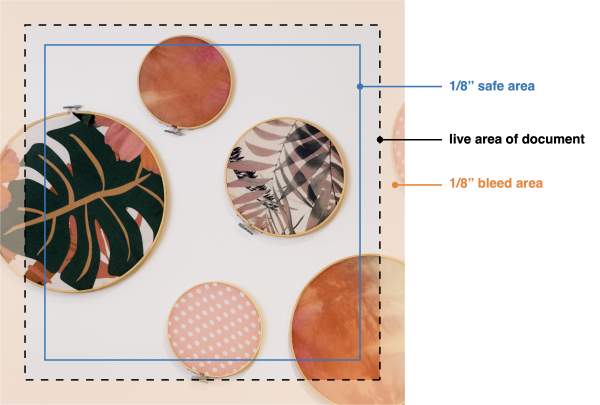
Cutting tolerance is the slight variation that occurs when online printing projects are cut down to size. Printive recommends a tolerance of 0.125″ for our online printing services, meaning the trim line can vary by up to 0.125″.
Anything that comes within 0.125″ of the edge of the cut line could potentially be cut off. Text or other elements you want to ensure are not trimmed away must be placed more than 0.125″ away from the expected edge of the design.
The image below shows considerations for setting up your document. Please note that if your project has artwork going to the edge, a 0.125″ bleed is needed.
You can download our Layout Guide to calculate and review measurements of your artwork files.
HELP CENTER / FILE PREPARATION / COLOR
Color
Color
- Artwork Guidelines
- Layout
- Bleed
- Cutting Tolerance
- Color
- Fonts
- Image Resolution
CMYK vs. RGB Mode
Both CMYK and RGB are color mixing modes in design. While RGB color models are best for websites and digital works, CMYK is the best color model to use for printing. Printing files in RGB will result in incorrect color printing issues therefore. CMYK is a color model for tangible printed materials and uses mixes of Cyan, Magenta, Yellow, and Key (Black). It’s best to start working on your art files in CMYK color mode to avoid any minor shifting in color during conversion from RGB to CMYK mode and print colors as accurate as possible.
If your completed files are in RGB color mode, you can use Adobe Photoshop or Illustrator to convert to CMYK color mode before submitting your files. Make sure to double check your colors if your artworks are color sensitive.
Spot Color - Pantone (PMS) Color
Pantone Color, also called PMS color, is a specific numbered color in the Pantone Matching System to facilitate accurate and consistent color reproduction. It is a standardized color reproduction system and is perfect when adding spot colors in your design. Each color has a PMS number assigned which is used to identify the exact color you want to use.
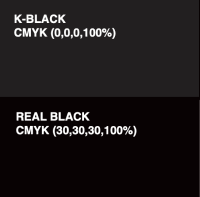
Using black : K-Black vs. Real Black
When using black in your design, keep in mind that there are two different types of black in printing; K-Black and Real Black (Rich Black). K-Black uses only black ink while Real Black uses all four CMYK values to give richness and depth to the color. While the two black colors may look similar on screen, they are drastically different on print.
Use K-Black for for text and artworks with very delicate lines or extremely small texts. Also use K-Black for projects that consist of text only or B/W color.
Use Real Black for large type, black over another color, solid black areas, and images. Keep in mind that Real Black is much closer to the standard black color that is deep and rich which you would expect to see on print while K-Black resembles a dark gray when printed.

HELP CENTER / FILE PREPARATION / FONTS
Fonts
Fonts
- Artwork Guidelines
- Layout
- Bleed
- Cutting Tolerance
- Color
- Fonts
- Image Resolution
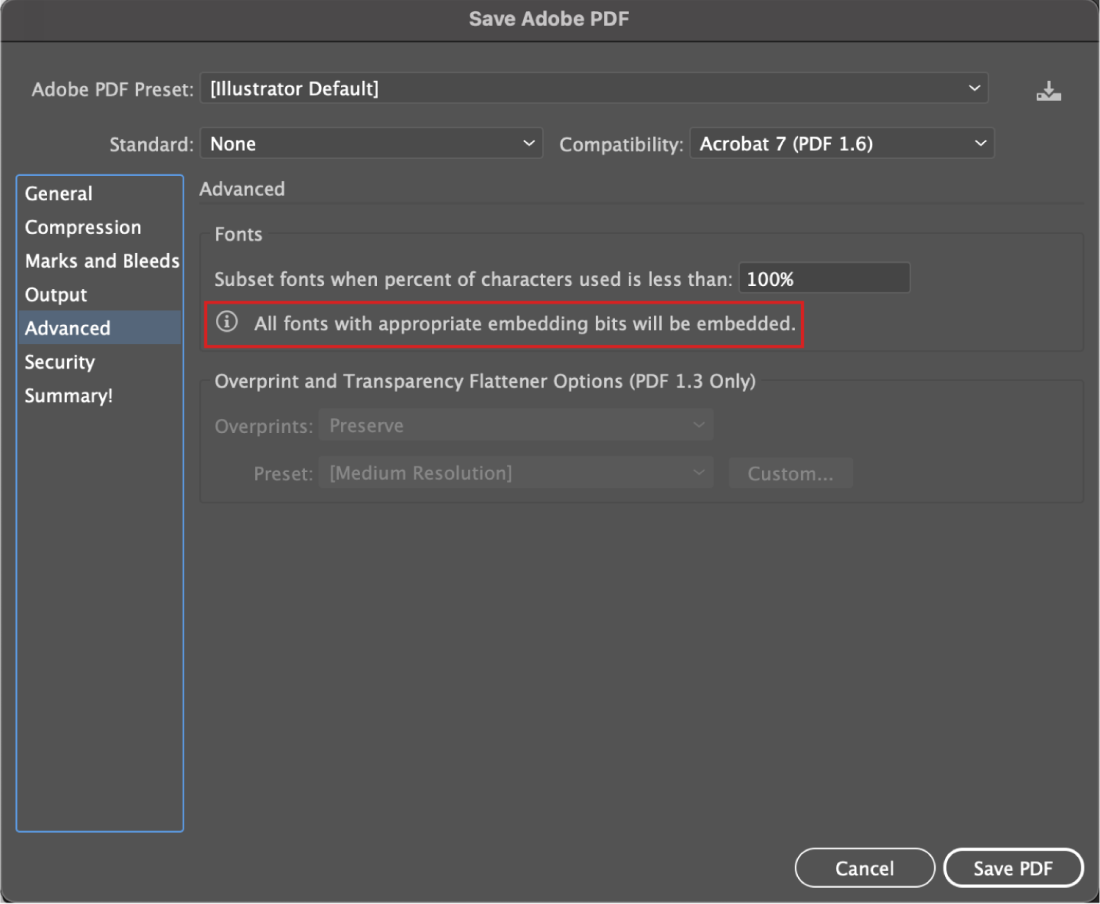
Font Embedment
Embedding font is essential for printing, especially during proofing. Embedding fonts ensures that all fonts used in your artwork files and its information are stored in the PDF file. This helps prepress team to make sure we are using the fonts you have chosen in your final artwork files for production. To make sure all fonts are displayed correctly for printing, embed all fonts and this can be done in Adobe Creative Suite.
Before approving proofs, always double check whether your proof files are using fonts you used in your final artwork files uploaded. If you hadn’t embedded all your front files, fonts may have automatically changed during proofing, throwing off the entire design of your project.
How to embed font
If you aren’t sure or cannot remember whether you have embedded fonts in your files, you can review the font export setting in Adobe Acrobat. Open your files in Adobe Acrobat, right-click in the open document and select Document Properties. Click Font tab to see a list of all fonts in your document and check for font embedment before submitting your files to us.
HELP CENTER / FILE PREPARATION
/ IMAGE RESOLUTION
Image Resolution
Image Resolution
- Artwork Guidelines
- Layout
- Bleed
- Cutting Tolerance
- Color
- Fonts
- Image Resolution
Image Resolution
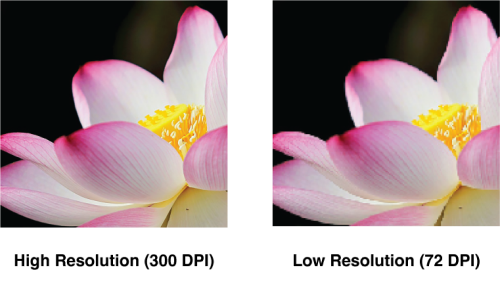
Image resolution will play an essential role in determining the quality of your project especially if your project include lots of images or graphical elements. You may use low-resolution files or images and think that they do not seem as low quality on the screen but it will make a big difference once printed. Using 300 DPI files is highly recommended for high quality print resolution and crisp representation of your design.
DPI(dots per inch)
DPI is the number of dots in a printed inch. The higher DPI is the more dots used per inch hence higher quality and more sharpest of artworks.
Differences in DPI
In the image below, you will see that image in high resolution (300 DPI) and low resolution (72 DPI) have clear difference in representation of graphical or color accuracy. High resolution images can preserve more details and provide crisp and clear representation of your artworks. Converting low resolution images to higher resolution is not possible and it is important to begin working on your artwork files with high resolution images in the first place.